Best trolling spread for marlin
You've decided to tackle the ultimate challenge of Hawaii fishing: chasing marlin. But let's be honest, just looking at a boat set up for big game trolling can be intimidating, right? All those rods, lines, and lures create a dizzying array, making you wonder how anyone knows where to even begin. If you've ever felt overwhelmed by the thought of setting up an effective trolling spread for marlin, you're not alone. This comprehensive guide is going to break down the best trolling spreads for marlin in Hawaii, helping you understand the "why" behind each lure placement and how to maximize your chances of hooking into that dream fish.
The Art and Science Behind a Marlin Trolling Spread in Hawaii
When you talk about marlin fishing in Hawaii, especially off the legendary Kona Coast, you're entering a world where tradition meets cutting-edge technique. It's not just about dragging lures behind a boat; it's about creating an illusion, a tantalizing buffet of baitfish and fleeing prey that screams "easy meal" to a massive predator. A well-designed trolling spread is your primary tool in this endeavor, designed to cover water efficiently, present diverse lure profiles, and, most importantly, entice a marlin to strike.
Why a Thoughtful Spread Matters for Marlin
Think of your trolling spread as a team of swimmers, each with a different style and personality, working together to get noticed. A haphazard collection of lures tossed in the water might catch something, sure, but a thoughtful spread maximizes your chances by appealing to a marlin's natural hunting instincts. Marlin are apex predators, constantly scanning for opportunities. A dynamic spread creates turbulence, vibrations, and visual commotion that mimics a school of panicked baitfish or injured prey. Each lure in its designated spot contributes to this overall picture, creating a more attractive target than a single lure ever could. It’s about creating a "feeding zone" directly behind your boat, an irresistible invitation for a marlin to come investigate and eventually commit to a strike. This strategic approach is crucial whether you're targeting grander marlin or just hoping for your first billfish.
Common Misconceptions About Trolling for Marlin
One of the biggest misconceptions about marlin trolling is that more lures automatically equal more fish. While having a spread is essential, simply deploying a dozen lines without understanding their individual roles or how they interact can actually be counterproductive. Too many lines can lead to tangles, especially when a fish hits or when making a turn. Another myth is that you need the most expensive, high-tech gear to succeed. While quality gear is certainly a plus for durability and performance, a well-set spread with good quality, proven lures (which you can often find on platforms like Amazon with great reviews) will outperform a chaotic spread with top-tier equipment any day. It's about presentation and understanding the behavior of the fish, not just the price tag of your tackle. Many anglers also believe that marlin only hit the biggest lures; while they certainly eat large prey, often the smaller, more agile lures in the spread can draw strikes, especially from striped marlin or spearfish.
The Kona Coast Advantage for Trolling Spreads
The Kona Coast of the Big Island offers a unique advantage for marlin trolling that influences spread design. The deep waters drop off dramatically very close to shore, creating an incredibly productive fishing ground often just a few miles from the harbor. This means less travel time and more fishing time in prime habitat. The calm leeward waters, protected from strong trade winds, allow for more consistent trolling speeds and easier management of complex spreads. Captains here have honed their techniques for generations, developing highly effective spreads tailored to the local conditions and the abundance of baitfish like aku (skipjack tuna) and opelu (mackerel scad). When you're out there, you'll often see other boats running spreads that reflect years of accumulated wisdom. If you're looking for specifics, checking out guides on Marlin Fishing off the Kona Coast can provide a deeper dive into the local nuances.
Essential Elements of Your Marlin Trolling Arsenal
Building an effective marlin trolling spread isn't just about placing lures; it's about selecting the right tools for the job. Each component, from the lure itself to the rod holding it, plays a crucial role in the overall presentation and your ability to successfully land a fish. Understanding these elements is fundamental to creating a spread that truly works.
Lure Selection: Size, Shape, and Color
The variety of marlin lures available can be dizzying, but they generally fall into a few categories based on their action and appearance.
- Plunger Lures: These have a flat or concave face that "digs" into the water, creating a large splash and a bubble trail. They are known for their aggressive action and are great for attracting attention from a distance.
- Bullet Lures: Sleek and streamlined, bullet lures run fast and true, often just under the surface. They mimic fleeing baitfish and are excellent "shotgun" lures (we'll get to that later).
- Chugger Lures: Featuring a deep cup face, chuggers create a strong "pop" and a significant surface disturbance, mimicking a fish struggling on the surface.
- Skirted Baits: These are arguably the most iconic marlin lures. The plastic or vinyl skirts come in endless color combinations and provide flash, vibration, and a lifelike profile. The color choice is often debated among anglers, but generally, darker colors like black and purple work well in bright conditions, while brighter colors like pink, blue, and green are effective on overcast days or in murkier water. Often, lures that mimic local baitfish, like a dorado or aku pattern, can be highly effective. For an even more specific breakdown, check out Best Lures for Marlin Trolling off Kona.
Rod and Reel Setup for Each Position
Each position in your trolling spread will likely require a specific rod and reel setup, primarily based on the line class you're fishing. For marlin, you'll typically use heavy tackle, often 50-pound, 80-pound, or even 130-pound class outfits.
- Short Corner/Flat Line: These rods are often positioned closest to the boat, usually in gunwale holders. They need to be stout, capable of handling a big strike right at the boat. An 80-pound class rod and reel combo is common here.
- Short Rigger/Long Rigger: These positions extend further out and back. The rods for riggers often have slightly softer tips to absorb the shock of a strike and ensure the line releases smoothly from the outrigger clip. 50-pound or 80-pound class setups are typical.
- Shotgun: This is your furthest lure, often requiring a larger reel like a 130-pound class to hold ample line and provide leverage for the long fight that might ensue.
- Reels: Lever drag reels are standard for marlin, allowing for precise control of drag pressure during the fight. Look for reels with smooth drags and plenty of line capacity. Brands like Penn, Shimano, and Accurate offer excellent options. You can often find great deals and reviews on these types of reels on Amazon.
Teasers and Dredges: Attracting the Big Ones
Teasers and dredges are crucial, non-baited tools designed solely to attract fish into your spread. They don't have hooks, but they play an enormous role in raising marlin to the surface and getting them excited.
- Teasers: These are typically large, flashy lures, often rigged in a chain or combination, that are deployed closer to the boat than your main fishing lines. They create a huge commotion, splash, and bubble trail, mimicking a school of baitfish in distress. When a marlin comes up to investigate a teaser, it usually gets "lit up" and excited, making it more likely to pounce on one of your hooked lures. Common teasers include large unskirted tuna lures, squid chains, or even artificial flying fish.
- Dredges: A dredge is a highly specialized teaser that creates the illusion of a massive school of baitfish. They consist of dozens, sometimes hundreds, of artificial baits (often soft plastic squids or fish imitations) rigged on a collapsible frame. When deployed, they fan out underwater, creating a huge, lifelike "cloud" of bait that can attract marlin from a great distance. Dredges are incredibly effective but also complex to deploy and retrieve, often requiring dedicated dredge reels. While not every recreational angler might run a dredge, they are a staple on many professional charter boats.
Crafting Your Spread: Positioning Lures for Maximum Impact
Now we get to the heart of it: putting it all together. The goal of a trolling spread is to create an organized, appealing presentation where each lure has its own swimming lane, avoiding tangles while maximizing visibility and strike appeal. The specific setup will vary depending on your boat, the number of rods you're running, and personal preference, but certain positions are universally recognized for their effectiveness.
The "Short Corner" and "Long Corner"
These are the closest positions to the stern of your boat, often referred to as "flat lines." They get their name because they run with very little line angle, often straight off the stern without the use of outriggers.
- Short Corner: This lure runs tight in the prop wash, just behind the transom. It gets a lot of clean, aerated water, making it incredibly appealing. This position is ideal for larger, more aggressive lures that create a lot of splash and commotion, as marlin often charge the prop wash directly. An 80-pound class setup is typical here. The close proximity allows for a quicker hookup and often gets immediate attention from marlin that come up behind the boat.
- Long Corner: Positioned slightly further back and often slightly wider than the short corner, the long corner lure still benefits from the turbulent prop wash but presents itself as a slightly straggling, easier target. This spot is also excellent for active, splashy lures. The distance helps prevent tangles with the short corner, especially during turns or when a fish strikes. Both corner positions are usually run from rod holders located in the stern of the boat.
The "Short Rigger" and "Long Rigger"
Outriggers are those long poles extending from the sides of your boat, designed to spread your lines out wide and away from the prop wash. They allow you to run more lines simultaneously without tangling and give your lures a more natural swimming action in clean water.
- Short Rigger: This lure is positioned further back than the corners, running in the first "clean" water behind the prop wash. It's usually the second closest lure to the boat on each side. The outrigger clip allows the line to be released instantly when a fish strikes, giving the marlin time to fully engulf the lure before feeling the full drag of the rod. This position is versatile and can run a variety of lure types, often one that has a consistent, appealing action.
- Long Rigger: This is the furthest lure out on each side, running in the cleanest, undisturbed water. It's often the lure that presents as the most natural, unpressured baitfish. Long rigger positions are excellent for lures with subtle actions or even natural baits if you choose to incorporate them. Marlin often approach from the deep or the side, and the long rigger presents a tempting target further afield. You'll typically deploy these lures via outrigger clips, ensuring they're running wide and at different depths than your other lures, creating a truly broad presentation.
The "Shotgun" or "Stinger" Lure
This is often the final and furthest lure in your spread, deployed straight off the center of the transom (or sometimes from a center rigger). The "shotgun" or "stinger" is designed to run way back, often hundreds of feet behind the boat, in the absolute cleanest water.
- Why it works: Many marlin, especially older, wiser ones, are wary of boats and may hold back, observing the spread from a distance. The shotgun lure, far removed from the boat's commotion and prop wash, appears as an isolated, easy meal. It's often a bullet-style lure that runs fast and true, mimicking a lone fleeing baitfish. It's not uncommon for a marlin to ignore the entire main spread, only to pounce on the shotgun lure way out the back. This setup often requires a heavier line class, like a 130-pound outfit, simply because of the long fight you might have on your hands with a fish that hits so far back. For more on the species you might encounter, delve into Hawaii Pelagic Species Bag Limits.
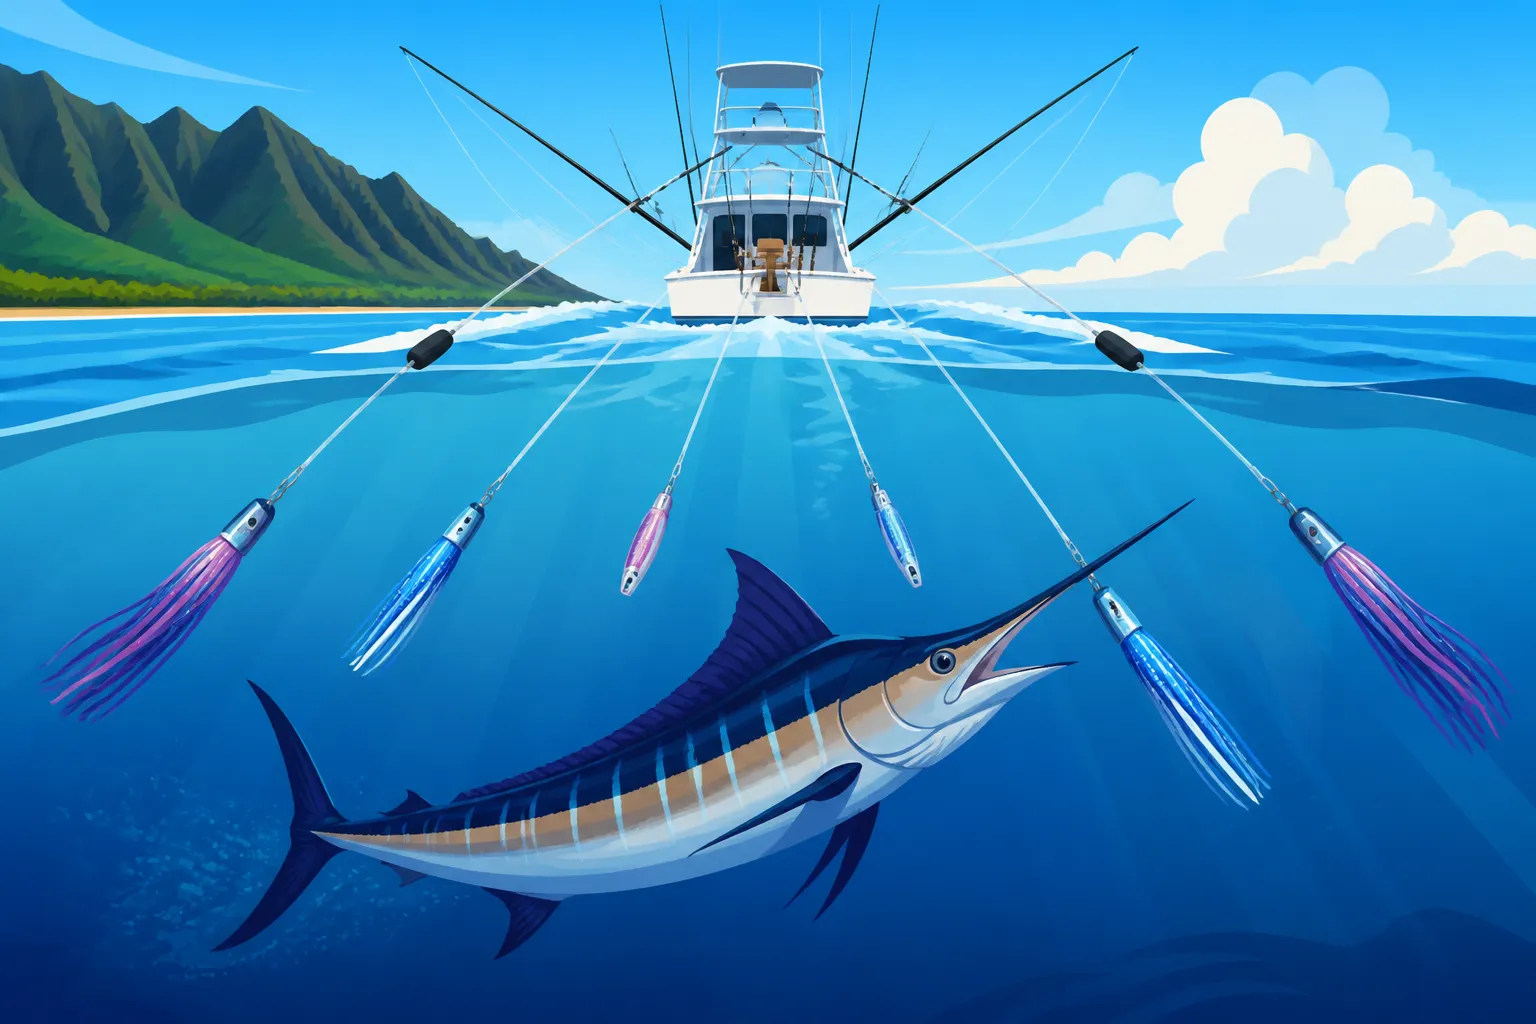
Here's a simplified visual of a common 5-lure spread configuration:
| Position | Distance from Transom (Approx.) | Lure Type Suggestion | Action | Rod Class (Typical) |
|---|---|---|---|---|
| Short Corner | 15-25 ft | Plunger, Large Chugger | Aggressive, surface pop | 80 lb |
| Long Corner | 25-40 ft | Chugger, Large Bullet | Surface splash, deep dive | 80 lb |
| Short Rigger | 40-70 ft | Bullet, Medium Plunger | Consistent, clean run | 50-80 lb |
| Long Rigger | 70-120 ft | Bullet, Small Plunger | Natural, subtle action | 50-80 lb |
| Shotgun | 150-300+ ft | Bullet, Streamlined Skirt | Fast, subsurface run | 130 lb |
Note: Distances are approximate and will vary based on boat speed, lure type, and ocean conditions.
Dynamic Adjustments: Reading the Ocean and Your Spread
A trolling spread isn't a static setup; it's a dynamic system that requires constant observation and adjustment. The ocean is ever-changing, and the marlin's behavior can shift throughout the day. The best anglers are those who can "read" the water and fine-tune their spread to match the conditions, ensuring their presentation remains irresistible.
Speed and Direction: Fine-Tuning Your Troll
Your trolling speed is one of the most critical factors influencing how your lures run and how appealing they are to marlin.
- Typical Speed: For marlin, a common trolling speed ranges from 6 to 10 knots. At these speeds, your lures should be swimming with their intended action—splashing, diving, and darting. Too slow, and they might just drag lifelessly; too fast, and they could blow out of the water or lose their proper action. The ideal speed can even change based on the specific lures you're running, so observe them constantly.
- Current and Wind: When trolling against a strong current or into a headwind, you might need to increase your engine RPMs to maintain your desired speed over ground. Conversely, with a following current or tailwind, you might need to reduce RPMs. Always keep an eye on your GPS for true speed over ground, not just your boat's speedometer.
- Making Turns: Turns are crucial because they change the speed and depth of your lures dramatically. As you turn, the lures on the inside of the turn will slow down and sink, while those on the outside will speed up and rise. This erratic action can often trigger a strike from a following marlin. Don't be afraid to weave and make S-turns; it's a proven tactic. You might also find similar advice on Best Trolling Speed for Ahi in Hawaii as many pelagic species react to these changes.
Adapting to Current, Wind, and Baitfish
The ocean environment dictates much of your strategy. Marlin are highly migratory and attuned to their surroundings, especially the presence of bait.
- Current Lines and Eddies: Look for current lines, temperature breaks, or eddies. These are often convergence zones where baitfish gather, and where predators like marlin will hunt. Trolling along these lines can be incredibly productive.
- Wind and Swell: In choppier conditions, some lures might struggle to run cleanly. You might need to adjust your lead lengths, change lure types, or even slightly reduce speed to keep your spread working effectively. Running with a following sea can make your lures surf and track erratically, which can be good, but you need to ensure they're not constantly breaching and tangling.
- Baitfish Schools: Spotting schools of aku, opelu, or other baitfish is a huge advantage. Marlin will be in the vicinity. Troll around the edges of these schools, or directly through them if they're not too dense. Sometimes, if you're on a charter, they might even cast net some live bait to use for pitch baits when a marlin shows up behind a teaser. Knowing What marlin eat off the Kona Coast can help you select lures that mimic the local forage.
Troubleshooting Your Spread: What to Do When Nothing's Biting
It happens to everyone: you've got a beautiful spread out, conditions look good, but the fish just aren't cooperating. Don't give up! This is when your ability to troubleshoot really comes into play.
- Change Lures: If a specific lure isn't getting any attention, swap it out. Try a different size, shape, or color. Sometimes a subtle change is all it takes. Keep a diverse tackle box, much like what you'd find looking at options on Amazon, so you have plenty of choices.
- Adjust Spacing and Depth: Experiment with how far back each lure runs. A few feet difference can sometimes put a lure into a marlin's strike zone. For example, if you suspect fish are running deeper, you might try lures that track a bit deeper or use small trolling weights (though generally avoided for marlin lures).
- Vary Speed and Course: Don't just hold a straight line. Make those S-turns, speed up, slow down, even stop for a moment (a "dead boat" retrieve can sometimes trigger a strike as lures sink). These changes can simulate an injured baitfish.
- Check Leaders and Hooks: Always ensure your leaders aren't chafed and your hooks are razor sharp. A dull hook can mean a lost fish.
- Move On: If an area isn't producing, don't waste precious time. Consult your charts, look for FADs (Fish Aggregating Devices), or head to known productive zones like those detailed in a Kona Coast Fishing Guide. Sometimes, a change of scenery is the best adjustment you can make. Remember, perseverance and adaptability are key when chasing these incredible fish.
Disclaimer
This article is for general informational purposes only and does not constitute professional advice. Laws, prices and regulations vary by location and change over time. Consult a qualified professional for guidance on your specific situation.